|
|
|
|
|
COLLECTION
|
FEEDBACK
|
|
Technical Zone
fundamentals
| I
have had email from visitors saying that they would love to have a go
with one of these old film cameras but are not familiar with manual
cameras "what do the dials do" "what do they mean"
Here is a basic course in manual operation cameras covering viewfinder and rangefinder types, with and without light meter.
|

Simple Viewfinder type |
Viewfinder with Lightmeter |
Rangefinder with Lightmeter
|
||
|
The four fundamentals of photography, whether it's
film or digital, are Speed, Aperture, Sensitivity and Focus.
Modern cameras can control all of these factors mostly automatically but back in the day these were controlled manually. This required adjustment rings and dials. The basic concept of these is fundamentally the same for all cameras irrespective of their country of origin. There are, however, some differences in the positions of the respective controls. i.e. front or back of the lens housing or even remotely mounted on some part of the camera body, particularly speed and sensitivity controls. Fortunately the standards for identifying are much the same so it's not too difficult to work out which ring or dial does what. As you work your way through the different calibrations you may notice that there are coincidental "steps". This is not actually just coincidence but is a calculated inter dependence. The Speed, Aperture and Sensitivity are all dependant on a relationship between each other. The "steps" are set up in such a way that moving up a step in one area will require a corresponding move down in one of the other two. With film, however, one of these is fixed by the sensitivity of the film itself, the other two then revolve around it.
|
|
SPEED: In this case I refer to exposure speed, not to be confused with what is sometimes called film speed which really should be sensitivity. The speed is usually controlled by a lens mounted ring, there are some specialised cameras which have a separate speed control but we are not too concerned with these here. This ring will be calibrated with a series of sequential numbers normally doubling with each step. e.g 30,60,125,250 etc. Before the introduction of fully international standards there were two scales the alternative being 25,50,100,200 etc.
|
|
APERTURE: This controls the "Iris" or
"Diaphragm" which governs the amount of light passing through
the lens and is always lens mounted.
This can be identified by it's calibration which will probably run from something like 2.8, 4, 5.6, 8, 11, 16. These are referred to as "f stops" or just "stops". This is in reverse in that the lowest number is the largest opening. Just to confuse you more the term "stopping down" means you move to a higher number.
|
|
SENSITIVITY: This is even more confusing because
there are different standards DIN, ISO, ASA and BS. German, European,
American and British respectively. Fortunately most cameras that have
adjustability for sensitivity use at least two of these scales. In film
terms the ISO is pretty much the norm and that's what interests us here.
The adjustment for this may take some searching, more often than not it
will be on the underside of the lens mount and is moved by releasing a
catch of some kind. This varies according to lens makes.
All film types have a sensitivity rating, as I have mentioned this is sometimes referred to as "film speed" but I will stick to sensitivity to avoid confusion. This will normally have a number like 50, 100, 200, 400 etc. There are a few specialist films with odd ratings but we're not bothered with those at this stage.
|
|
FOCUS: Some lenses have a free moving focus
ring and some have what is known as "range focusing" or a
combination of range and free focus. Range focus is controlled by having
positive click stops at what is regarded as optimum setting for a given
range. i.e. close up, groups, long range etc.
This control speaks for itself and is usual identified by calibration in feet or metres, or both. In some cases with range focus it will have icons to identify the grouping. This again is always lens mounted but can be front of back ring depending on the lens type and make.
|
|
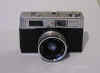
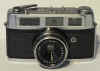
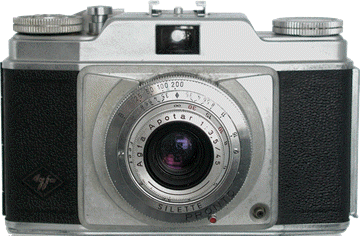
Having now identified the basic criteria lets take a look at specifics to make it easier to see. In the case of the Simple Viewfinder Type above if you expand the picture you will see: (Illustarted is Ilford Sportsman 2) The speed ring is obvious, its staring you in the face. Marked B, 25, 50, 200. This is a low budget Vario 3 speed where the 100 speed has been omitted, had it been a more upmarket Pronto it would have the 4th speed included. "B" incidentally stands for Bulb which holds the lens open as long as you hold down the shutter release, used for "time exposure". I'm not going to that level of detail here so don't worry. At the front of the lens is the focus ring, in this case a simple free moving ring from around 3 feet to infinity. The figure 8 sideways is the symbol for infinity. Immediately behind the focus ring, before the speed ring, is a fixed calibration scale. I'll tell you what that is once you've mastered the basics, ignore it for now. Right at the back is a slot with a lever to adjust the "f stop". This is sometimes a ring and sometimes a lever like this, it depends on the make and type of lens. You are now wondering where the sensitivity control is, there isn't one. This is only necessary when you have a lightmeter built in to the camera. Moving on to the Lightmeter type camera. (Illustrated is a Halina 3000) The fundamental difference here is that you have a built in lightmeter to take out some of the guesswork. This is identified by the secondary window that looks like a reflector, that's because it is but in reverse. It reflects light into the housing which contains a "sellenum cell". A clever little electrical gadget, kind of forerunner to the solar panel, which measures the light and send a small electrical signal to a meter somewhere on or in the camera. In this particular case its on the top panel but it varies according to make and model. Some more upmarket cameras e.g. Kodak Retinette 1b have the meter built in to the viewfinder so that adjustment can be made without taking the camera away from eye. Going back to the Halina, in this case the meter is calibrated with yet another scale known as EV (Exposure Value) but beware. This is not a "standard" but a guide for the camera to which it applies. i.e. the EV on this camera may not relate to a different camera. There was a movement to standardise but this was never really cemented so don't trust it. Far eastern (Japan etc) cameras use this system extensively because it simplifies the calculation for setting the speed/aperture ratio. As the exposure of an image relies on both the speed and aperture setting this works like a ready reckoner combining the two factors and is adjusted by either. On the lens body you will find a window which has the corresponding scale and if you adjust either the speed or aperture the window will show the movement. Now for the last in this section, the Rangefinder type. (Illustrated is a Rank Mamiya Sekor) This particular model has both lightmeter and rangefinder but there are many that don't have the lightmeter. The rangefinder is a kind of mathematical focusing system. You will note that there is an extra window on the camera which has a small square in it. This is the rangefinder window, this is not always square some are round and some are diamond, but they all provide the same function. In addition to the different styles some are "coupled" and some are separate, rather like lightmeters. Coupled means that they are visible through the main viewfinder window and these are the ones which concern us here. This works on a principle of mathematical triangulation taking two viewpoints of the same image and by adjusting the angle of incidence the distance from the camera can be estimated and will (hopefully) match the callibration of the focus ring. When you look through the viewfider you have a "main" image which is clear and also you will see a "ghost" image in a small part of the window. Quite often this will be coloured bright yellow for clarity. This is transmitted by mirrors in the top of the camera and the principle is that when the ghost image aligns with the main image this is the point of focus. I find this to be a very accurate form of focusing provided that the calibration of the lens is correct. It has the advantage that it is not as dependant on your eyesight as lens focusing with, say, an SLR. Just as a closing note in this section. Both Lightmeters and Rangefinders are quite readily available as accessories and can be used in conjunction with any camera by transposing the readings to the relevant lens ring. I'll see you tomorrow for the Master Class.
|
|
Website hosted
by obscura135
|

 ©35mil
Plus all rights reserved
©35mil
Plus all rights reserved